Welcome to JHipster.NET documentation!
Thanks for taking a look at the JHipster.NET documentation. Please use the left hand nav to get around. I would suggest taking a look at introduction first.
You can also find lot of information in https://www.jhipster.tech
Big Picture
JHipster is a well-known platform for generating modern application in java world. JHipster provides a blueprints system that allows to override the default behavior of the generator
JHipster.NET is a blueprint that overrides the back-end part, originally generated in spring boot, by back-end in asp.net core. For the front-end all the common language can be used (angular, react, vue.js).
In alpha version we also have the possibility to choose either Blazor or Xamarin for the front.
This blueprint is an official blueprint of JHipster official-blueprints
Getting Started
Prerequisites
As this is a JHipster blueprint, we expect you have JHipster and its related tools already installed:
Generate your first application
Installation of the blueprint
npm install -g generator-jhipster-dotnetcore
Call the generator
jhipster --blueprints dotnetcore
After running this command you have few questions to answer, as Application name, authentication mode, client framework etc Once it’s done, you can build and run your application.
dotnet run --verbosity normal --project ./src/YourAppName/YourAppName.csproj
Your first application is ready and you can now use it with default user like JHipster (admin admin or user user)
Ok now you have an application but without entity. JHipster allow you to add entity with cli or with jdl file (add link) JHipster.NET have the same behavior.
jhipster entity <entity-name>
Or with jdl
jhipster import-jdl my_file.jdl
You can edit jdl with https://start.jhipster.tech/jdl-studio/
You have now an application with CRUD operations on each new entities with potentially link between entities (one-to-one, many-to-one or many-to-many)
Default configurations are availables in the generated project. As an example, a docker compose file is generated with monitoring solutions (influxdb telegraf and chronograf or grafana)
The repository : https://github.com/jhipster/jhipster-dotnetcore
Sample project : https://github.com/jhipster/jhipster-sample-app-dotnetcore
Azure
Deploy using Terraform
Currently supports only monolithic app with SQL Server as database (support for other databases are WIP). Terraform scripts will create Azure App Service, Azure SQL Server
Prerequisites
- Docker installed with docker-compose and have push access to any of the docker repository like docker hub or Azure container registry.
- Azure CLI installed on your system. Terraform will require it to authenticate in Azure subscription.
- Terraform CLI installed on your system.
Steps to follow
- Execute generate app command and select app as Monolithic with Microsoft SQL server as database. Select yes to generate Terraform scripts. (default: is No)
 use-azure
 - Use docker-compose command to first build the docker image.
docker-compose -f docker/app.yml build
- Tag the image built during the previous step to push to docker repository by using
docker tag <source-image> <destination-image>:version/tag
- Push the image to docker hub or any docker service provider by using
docker push <destination-image>:version/tag
Note: The docker image link and its tag will use as input to Terraform variables. 5. In the generated app folder, change directory to the Terraform folder.
cd terraform
- Login into your Azure CLI by using
az login
Note: Terraform plan command will work only if the user is authenticated using Azure CLI.
- Create a file (terraform.tfvars) in the Terraform folder to provide input to the Terraform main script using below content:
location = "Central US"
subscription_id = "<your-azure-subscription>"
mssql_admin_user = "dbUser"
mssql_admin_password = "Password!12"
docker_image = "a5ingh/jhipster-dotnetcore-sampleapp"
docker_image_tag = "0.1"
- Execute below terraform commands (one by one) to create resources (Azure app service, Azure SQL) and deploy as a docker image to app service:
terraform init# to initialize terraform.terraform plan -out "MyAppPlan"# can choose any name instead of MyAppPlan.terraform apply "MyAppPlan"# it will create the resources and then provide you the link to your deployed app as output variable.
- You can use
terraform destroyto delete/remove all the created resources once you are done using it.
Code Analysis
Running SonarQube by script
- Run Sonar in container :
docker-compose -f ./docker/sonar.yml up -d - Wait container was up Run
SonarAnalysis.ps1and go to http://localhost:9001
Running SonarQube manually
- Run Sonar in container :
docker-compose -f ./docker/sonar.yml up -d - Install sonar scanner for .net :
dotnet tool install --global dotnet-sonarscanner
- Run
dotnet sonarscanner begin /d:sonar.login=admin /d:sonar.password=admin /k:"YourProject" /d:sonar.host.url="http://localhost:9001" /s:"`pwd`/SonarQube.Analysis.xml"
- Build your application :
dotnet build - Publish sonar results :
dotnet sonarscanner end /d:sonar.login=admin /d:sonar.password=admin - Go to http://localhost:9001
CQRS
Introduction
CQRS stands for Command Query Responsibility Segregation. You have the possibility to use this pattern thanks to MediatR.
When generating your application, you can choose to use CQRS. Enabling it will generate a new layer for your commands and queries called Application.
├── Namespace.Application
│ ├── Commands - Your commands
│ │ ├── MyEntity - Your entity
│ │ │ ├── MyEntityCreateCommand - A command
│ │ │ ├── MyEntityCreateCommandHandler - An handler for your command
│ ├── Queries - Your queries
│ │ ├── MyEntity - Your entity
│ │ │ ├── MyEntityGetQuery - A query
│ │ │ ├── MyEntityGetQueryHandler - An handler for your query
├── Namespace.Crosscutting
├── Namespace.Domain
├── Namespace.Domain.Services
├── Namespace.Dto
├── Namespace.Infrastructure
Create your own Queries or Commands
In order to create your own commands and/or queries you have to create two classes :
- A command/query
- An handler for it
For instance, let’s create a query MyEntityGetQuery.cs:
namespace MyCompany.Application.Queries {
public class MyEntityGetQuery : IRequest<MyEntity>
{
public long Id { get; set; }
}
}
This Query should have an Id and returns a MyEntity object.
Here’s the handler MyEntityGetQueryHandler.cs :
namespace MyCompany.Application.Queries {
public class MyEntityGetQueryHandler : IRequestHandler<MyEntityGetQuery, MyEntity>
{
private IReadOnlyMyEntityRepository _myEntityRepository;
public MyEntityGetQueryHandler(IReadOnlyMyEntityRepository myEntityRepository)
{
_myEntityRepository = myEntityRepository;
}
public Task<MyEntity> Handle(MyEntityGetQuery request,
CancellationToken cancellationToken)
{
return _myEntityRepository.QueryHelper()
.GetOneAsync(myEntity => myEntity.Id == request.Id);
}
}
}
Please note that we are using a ReadOnlyRepository rather than a service in order to do the segregation between Commands and Queries. Lastly, create your routing method within your controller :
[HttpGet("my-entity/{id}")]
public async Task<IActionResult> GetMyEntity([FromRoute] long id)
{
var result = await _mediator.Send(new MyEntityGetQuery { Id = id });
return ActionResultUtil.WrapOrNotFound(result);
}
Cypress
When generating an application, you are able to automatically generate Cypress tests.
Introduction
Cypress is a next generation front end testing tool built for the modern web. It allows to run multiple end to end tests on all your application features.
Pre-requisites
When generating your application, make sure to check “Cypress” in your optional testing framworks (by pressing the space bar).
 cypress-choice
How to use it
Once your application is generated, you can optionally add some entities, it will automatically generate the corresponding tests for your entities. To begin, go to your ClientApp folder:
cd src/YourApplication/ClientApp
Then execute one of the following commands:
npx cypress open
or
./node_modules/.bin/cypress open
For futher information you can visit Cypress wiki.
Database
Using database migrations
If you had already run the application before creating your first migration, some database tables might be already created automatically on application startup. So you have the options of removing conflicting database tables or editing the migration you just created. If you wish to automatically apply database migrations when the application is started replace method EnsureCreated() by Migrate() at DatabaseStartup.cs file. Be aware of the implications of doing so, such as potential data loss. Currently it is up to the user to create migrations.
- Add EF Core cli tools
Since .Net Core 3.0 the cli tool for entity framework was removed from the core sdk so you need to install it globally. You only need to do this once. See Breaking changes included in EF Core 3.0 for reference.
dotnet tool install --global dotnet-ef
If using Visual Studio follow the documentation on Entity Framework Core tools reference - Package Manager Console in Visual Studio
- Create the initial database migration
dotnet ef migrations add InitialCreate --project YourProject.Infrastructure.csproj --startup-project YourProject.csproj
- Update the database
dotnet ef database update --project YourProject.Infrastructure.csproj --startup-project YourProject.csproj
Tips:
- Remember to change the connection string to point to your database at appsettings.json.
- It is a good practice to check your migration files and backup your database before running migrations.
Dependencies Management
Nuget Management
We have chosen to centralize the c# dependencies.
To do this we use a Directory.Build.targets file (you can find it in root folder)
This file contains all nuget dependencies with for each one their version.
To add a dependency, you need to add it in csproj without the version and add it in Directory.Build.targets with the version
example:
in csproj
<PackageReference Include="Newtonsoft.Json" />
in Directory.Build.targets
<PackageReference Update="Newtonsoft.Json" Version="12.0.3" />
Caution
Visual studio do not manage the nuget with Directory.Build.targets if you add or update nuget by visual studio you need to remove version in csproj and add or update dependency in Directory.Build.targets
DTOs
Using DTOs
Notice that this blueprint uses AutoMapper to handle dto conversion instead of Java’s mapstruct.
Example using JDL:
dto * with mapstruct
See JHispter’s documentation for more details about using DTOs.
Entities auditing
JHipster.Net implement basic Auditing on all the entities you save in the database.
Audit properties
This blueprint introduce a new base class named AuditedEntityBase that every generated entity will inherit from when we need to add the audit functionality. The properties use to audit entities are :
- CreateBy : The user who created the initial entry.
- CreatedDate : The datetime of creation of initial entry.
- LastModifiedBy : The user who modified the entry last.
- LastModifiedDate : The datetime the entry was last modified.
public abstract class AuditedEntityBase
{
public string CreatedBy { get; set; }
public DateTime CreatedDate { get; set; }
public string LastModifiedBy { get; set; }
public DateTime LastModifiedDate { get; set; }
}
Audit of generated Entities
For example, if we have a Task entity and we want to add audit functionality we would inherit from our AuditedEntityBase like that:
public class Task : AuditedEntityBase
{
public string Title { get; set; }
public string Description { get; set; }
}
Our Task class will have all the audit properties.
Automatically set properties audit
To automatically set the audit properties, we override the SaveChangesAsync method in our ApplicationDatabaseContext class:
public override async Task<int> SaveChangesAsync(CancellationToken cancellationToken = default(CancellationToken))
{
var entries = ChangeTracker
.Entries()
.Where(e => e.Entity is IAuditedEntityBase && (
e.State == EntityState.Added
|| e.State == EntityState.Modified));
string modifiedOrCreatedBy = _httpContextAccessor?.HttpContext?.User?.Identity?.Name ?? "System";
foreach (var entityEntry in entries)
{
if (entityEntry.State == EntityState.Added)
{
((IAuditedEntityBase)entityEntry.Entity).CreatedDate = DateTime.Now;
((IAuditedEntityBase)entityEntry.Entity).CreatedBy = modifiedOrCreatedBy;
}
else
{
Entry((IAuditedEntityBase)entityEntry.Entity).Property(p => p.CreatedDate).IsModified = false;
Entry((IAuditedEntityBase)entityEntry.Entity).Property(p => p.CreatedBy).IsModified = false;
}
((IAuditedEntityBase)entityEntry.Entity).LastModifiedDate = DateTime.Now;
((IAuditedEntityBase)entityEntry.Entity).LastModifiedBy = modifiedOrCreatedBy;
}
return await base.SaveChangesAsync(cancellationToken);
}
In our implementation, we use the HttpContextAccessor to get the user name of current user. To have HttpContextAccessor available we just inject it into our ApplicationDatabaseContext class.
private readonly IHttpContextAccessor _httpContextAccessor;
public ApplicationDatabaseContext(DbContextOptions<ApplicationDatabaseContext> options, IHttpContextAccessor httpContextAccessor) : base(options)
{
_httpContextAccessor = httpContextAccessor;
}
Fronts
When generating an application, you are able to choose between multiple fronts.
Angular
Angular (commonly referred to as “Angular 2+” or “Angular v2 and above”) is a TypeScript-based open-source web application framework.
Generate your application
Call the generator
jhipster --blueprints dotnetcore
and choose Angular
 front-choice
For further information: Using Angular with JHipster
React
React (also known as React.js or ReactJS) is an open-source, front end, JavaScript library for building user interfaces or UI components.
Generate your application
Call the generator
jhipster --blueprints dotnetcore
and choose React
 front-choice
For further information: Using React with JHipster
Vue.js
Vue.js is a progressive, incrementally-adoptable JavaScript framework for building UI on the web.
Generate your application
Call the generator
jhipster --blueprints dotnetcore
and choose Vue
 front-choice
For further information: Using Vue with JHipster
Alpha - Xamarin
With a C#-shared codebase, developers can use Xamarin tools to write native Android, iOS, and Windows apps with native user interfaces and share code across multiple platforms, including Windows, macOS, and Linux.
Available features
- Handle registration and connection.
- Sidebar menu to navigate through pages.
- Entities and users management.
- Auto-generated entity models, services, views and viewmodels.
NuGet requirements
- akavache >= 7.1.1
- MvvmCross.Forms >= 7.1.1
- System.ComponentModel.Annotations >= 5.0.0
- System.Net.Http.Json >= 3.2.1
- Xamarin.Forms >= 4.6.0
- Xamarin.Essential >=1.5.3
Why Xamarin
Xamarin allows to take advantage of this blueprint. Indeed, it enables to generate a modern cross platform application with both front-end and back-end in C#.
Generate your application
Call the generator
jhipster --blueprints dotnetcore
and choose Xamarin
 front-choice
Structure
Any generated Xamarin application is structured as follows
client
├── Namespace.Client.Xamarin.Core - Your core application
│ ├── Models
│ │ ├── Entities - Generated models
│ ├── Services
│ │ ├── Entities - Generated services
│ ├── ViewModels
│ │ ├── Entities - Generated viewmodels
│ ├── Views
│ │ ├── Entities - Generated views
├── Namespace.Client.Xamarin.Android - Your Android application
│ ├── Resources
│ │ ├── drawable - Contains your images
│ │ ├── Layout - Contains your layouts
│ ├── Properties
├── Namespace.Client.Xamarin.iOS - Your iOS application
│ ├── Resources - Contains your images
│ ├── Properties
├── Namespace.Client.Xamarin.Shared - Shared code
│ ├── Constants - Contains shared constants
Limitations
For the moment, the Xamarin generation has certain limitations :
- No Offline mode
- No User managment
- No validation on entity fields
- No translation
- No Tests
- Only JWT security is implemented
Alpha - Blazor
Blazor is a free and open-source web framework that enables developers to create web apps using C# and HTML.
Why Blazor ?
Blazor can run your client-side C# code directly in the browser, using WebAssembly. Because it’s real .NET running on WebAssembly, you can re-use code and libraries from server-side parts of your application. (https://dotnet.microsoft.com/apps/aspnet/web-apps/blazor)
Generate your application
Call the generator
jhipster --blueprints dotnetcore
and choose Blazor (WebAssembly)
 front-choice
After that, your application is ready, and you can now use it with default user (admin admin or user user)
Generate entities
Like the others front technologies you can generate entities for Blazor.
With CLI
jhipster entity <entity-name>
Tools
As the project used SASS, to install and consume SCSS third parties libraries like Bootstrap we use Microsoft Library Manager (aka libman) You can find libman configuration in the same directory than the client solution (./src/client/YourAppName.Client)
To minify CSS we use Excubo.WebCompiler (aka webcompiler)
These two tools are installed during JHipster client generation, and you can find the execution in Client.csproj (./src/client/YourAppName.Client/YourAppName.Client.csproj)
UI components
To speed up our development we use Blazored components like Blazored.Modal or Blazored.SessionStorage.
We also use Blazorise which has really interesting components.
UT
For unit test we use the awesome library bUnit.
You can find client unit test in ./test/YourAppName.Client.Test
Limitations
For the moment, the Blazor generation has certain limitations :
- Only support DTO you can’t use application without DTO
- No validation on entity fields (The validation is only on user management part)
- No translation
- Only JWT security is implemented
Heroku Deploy
This sub-generator initializes a Heroku .Net 5 app that is ready to push to Heroku.
Pre-requisites
Before running the sub-generator, you must install the Heroku CLI. You must also create a Heroku account and run:
heroku login
Git is also required to deploy to Heroku.
Deploying to Heroku
To deploy your .Net 5 application to Heroku, run this command:
jhipster heroku
git push heroku main
This will initialize a new Heroku app and git push your application to Heroku. Free tier dynos and database addons are used by the generator. A verified Heroku account might be needed to add some of the resources.
This Heroku sub-generator is similar to its Java counterpart. Access the documentation at (https://www.jhipster.tech/heroku/). It might provide helpful insight. But keep in mind that there are some differences between both implementations of the Heroku sub-generator.
Databases
Currently MySql and PostgreSQL are supported and automatically added by the sub-generator when deploying to Heroku. JawsDB MySQL addon and Heroku Postgres addon are added to the Heroku app using the free tier.
Since the MSSQL addon is not free it requires manual provisioning. This sub-generator provides instructions on how to manually install the MSSQL addon.
Heroku creates an environment variable named DATABASE_URL when using database addons. It contains the following structure: dbType://user:password@server-url:db-port/db-name. If DATABASE_URL is present the database credentials are parsed at DatabaseConfiguration.cs to create a properly formed connection string. And it takes precedence over existing connection strings.
Notes: The heroku/nodejs buildpack is also added to the Heroku app. It is a pre-requisite to build Angular/React client applications.
A package.json is automatically added to the root folder as It’s required by the heroku/nodejs buildpack, otherwise the application deploy will fail.
Jincod’s Heroku .NET Core buildpack is used to deploy this .Net 5 application to Heroku.
MongoDB
When generating an application, you can choose to use a NoSQL Database thanks to MongoDB.
Introduction
MongoDB is a document-oriented NoSQL database used for high volume data storage. Instead of using tables and rows as in the traditional relational databases, MongoDB makes use of collections and documents.
Pre-requisites
When generating your application, make sure to choose “MongoDB” as your database.
 mongodb-choice
Difference with SQL databases
The main difference with the other SQL databases is that your IDs are handled as string and are stored in ObjectID instead of long.
Also, some classes are replaced in order to support MongoDB :
BaseEntity => MongoBaseEntity
GenericRepository => MongoGenericRepository
ReadOnlyGenericRepository => MongoReadOnlyGenericRepository
FluentRepository => NoSqlFluentRepository
WIP
Currently, MongoDB is only used for entities. Users/Accounts are managed with a in-memory Sqlite. This feature is still under development.
Monitoring
- Run container (uncomment chronograf and kapacitor if you would use it):
docker-compose -f ./docker/monitoring.yml up -d - Go to http://localhost:3000 (or http://localhost:8888 if you use chronograf)
- (Only for chronograf) Change influxdb connection string by
YourApp-influxdb - (Only for chronograf) Change kapacitor connection string by
YourApp-kapacitor - (Only for chronograf) You can now add dashboard (like docker), see your app log in Cronograf Log viewer and send alert with kapacitor
Repository
Creating/Updating entities should be done using the CreateOrUpdateAsync method. Simple queries are possible with the methods GetOne, GetAll and GetPage. Finally, deleting by id is implemented by the Delete method.
As with services, repositories classes/interfaces can also be extended by the developer and automatically registered with the DI container.
QueryHelper
More advanced queries are possible by using the the QueryHelper method to fluently adding filter, order and/or disabling entity tracking and seleting results.
Example:
var page = await _countryRepository.QueryHelper()
.Include(country => country.Region)
.GetPageAsync(pageable);
Add, AddRange, Attach, Update and UpdateRange
Add, AddRange, Attach, Update and UpdateRange are repository’s utility methods for the DbSet’s methods and can be used by the developers when doing multiple database operations. Those methods manipulate the change tracker and sets the state of the entitities to Added/Modified/Deleted/Unchanged and do not produce queries if SaveChangesAsync method is not called. Those methods are not async. AddAsync should only be used on special cases. See Microsoft’s documentation here.
Security
JWT
You can find the jwt configuration in appsettings.json
"Security": {
"Authentication": {
"Jwt": {
"Base64Secret": "bXktc2VjcmV0LWtleS13aGljaC1zaG91bGQtYmUtY2hhbmdlZC1pbi1wcm9kdWN0aW9uLWFuZC1iZS1iYXNlNjQtZW5jb2RlZAo=",
"TokenValidityInSeconds": 86400,
"TokenValidityInSecondsForRememberMe": 2592000
}
}
},
Enforce HTTPS
You can enforce HTTPS by setting "EnforceHttps": true in appsettings.Development.json or appsettings.Production.json.
"Security": {
"EnforceHttps": true
},
For more details, please see Enforce HTTPS in ASP.NET Core
OAuth2 and OpenID Connect
OAuth is a stateful security mechanism, like HTTP Session. Spring Security provides excellent OAuth 2.0 and OIDC support, and this is leveraged by JHipster. If you’re not sure what OAuth and OpenID Connect (OIDC) are, please see What the Heck is OAuth?
Keycloak
Keycloak is the default OpenID Connect server configured with JHipster.
To log into your application, you’ll need to have Keycloak up and running. The JHipster Team has created a Docker container for you that has the default users and roles. Start Keycloak using the following command.
docker-compose -f ./docker/keycloak.yml up
The security settings in appsettings.json are configured for this image.
appsettings.json:
...
"Security": {
"Authentication": {
"OAuth2": {
"Provider": {
"IssuerUri": "http://localhost:9080/auth/realms/jhipster",
"LogOutUri": "http://localhost:9080/auth/realms/jhipster/protocol/openid-connect/logout",
"ClientId": "web_app",
"ClientSecret": "web_app"
}
Keycloak uses an embedded H2 database by default, so you will lose the created users if you restart your Docker container. To keep your data, please read the Keycloak Docker documentation. One solution, with keeping the H2 database, is to do the following:
- Add a volume that will be persisted:
./keycloak-db:/opt/jboss/keycloak/standalone/data - Change the migration strategy from
OVERWRITE_EXISTING, toIGNORE_EXISTING(in the command section)
In production, it is required by Keycloak that you use HTTPS. There are several ways to achieve this, including using a reverse proxy or load balancer that will manage HTTPS. We recommend that you read the Keycloak HTTPS documentation to learn more about this topic.
Okta
If you’d like to use Okta instead of Keycloak, you’ll need to change a few things. First, you’ll need to create a free developer account at https://developer.okta.com/signup/. After doing so, you’ll get your own Okta domain, that has a name like https://dev-123456.okta.com.
Modify appsettings.json to use your Okta settings. Hint: replace {yourOktaDomain} with your org’s name (e.g., dev-123456.okta.com).
appsettings.json:
...
"Security": {
"Authentication": {
"OAuth2": {
"Provider": {
"IssuerUri": "https://{yourOktaDomain}/oauth2/default",
"LogOutUri": "https://{yourOktaDomain}/oauth2/default/v1/logout",
"ClientId": "client_id",
"ClientSecret": "client_secret"
}
Create an OIDC App in Okta to get a {client-id} and {client-secret}. To do this, log in to your Okta Developer account and navigate to Applications > Add Application. Click Web and click the Next button. Give the app a name you’ll remember, and specify http://localhost:[port]/login/oauth2/code/oidc as a Login redirect URI. Click Done, then edit your app to add http://localhost:[port] as a Logout redirect URI. Copy the client ID and secret into your application.yml file.
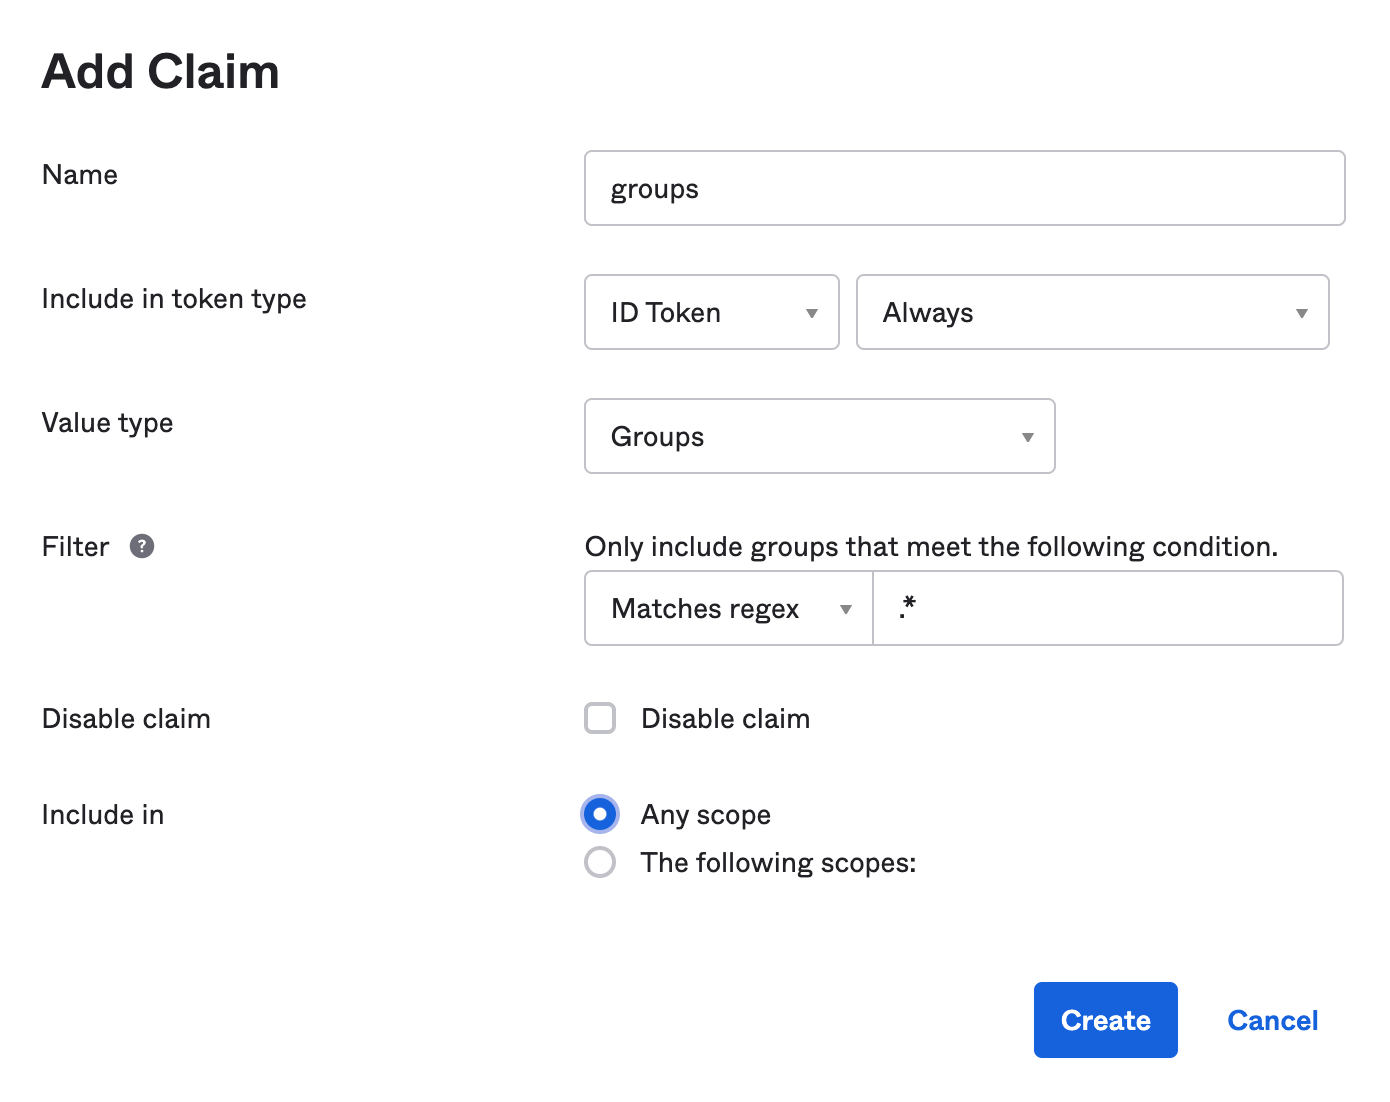
Create a ROLE_ADMIN and ROLE_USER group (Users > Groups > Add Group) and add users to them. You can use the account you signed up with, or create a new user (Users > Add Person). Navigate to API > Authorization Servers, and click on the default server. Click the Claims tab and Add Claim. Name it groups, and include it in the ID Token. Set the value type to Groups and set the filter to be a Regex of .*. Click Create.
Services
Generating Services
You can use services to move business logic away from controllers. It also allows you to use DTOs.
You can generate services using the entity generator:
jhipster entity newentity
Or by using JDL:
service all with serviceImpl except Employee, Job
Notice that only the service with interface option (serviceImpl) is enabled on this generator.
Extending and Customizing Services
One common use case is to customize service classes to suit different business needs. When using the jhipster generator to edit an existing entity or upgrading the generator’s version, changes to the generated service classes might be overwritten. Altough it is possible to make changes directly to generated service classes, It might get tricky keeping track of changes.
Optionally, you can extend and customize service classes to avoid service class code overwriting.
Example:
Add an Author entity with service generation enabled by using the generator’s cli.
Then create the following class named AuthorExtendedService.cs:
namespace MyCompany.Domain.Services {
public class AuthorExtendedService : AuthorService, IAuthorService
{
public CountryExtendedService(ApplicationDatabaseContext applicationDatabaseContext) : base(applicationDatabaseContext)
{
}
public override async Task Delete(long id)
{
// add custom business logic before delete
await base.Delete(id);
}
}
}
AuthorExtendedService class will override one specific method of its base class (or more if you wish) adding custom business logic and AuthorExtendedService class will be automatically be registered with the dotnet container. Any code using the IAuthorService dependency will use this class for its implementation.
Currently the automatic registration strategy for class/interface is used only for service and repository classes/interfaces and more details are explained below.
Automatic Service Registration In DI Container
Under the hood this project uses reflection for assembly scanning to automatically register service classes/interfaces with dotnet’s dependency injection container. Implementation details can be found at ServiceStartup.cs file located at src/ProjectName/Configuration/ folder.
The following steps are used to automatically register service classes and interfaces:
- Scan
ProjectName.Domain.Services.Interfacesnamespace (atProjectName.Domainassembly) for service interfaces andProjectName.Domain.Servicesnamespace (atProjectName.Domain.Servicesassembly) for service classes. - Find matching classes and its interfaces using the “I” prefix convention for interface name. This step registers the generated service classes/interfaces since they use “I” interface prefix convention, but user-defined services and interfaces can also be automatically registered using this convention. For example: JobService class matches IJobService interface, EmployeeService class matches IEmployeeService interface, MyNewService class matches IMyNewService interface, etc…
- Service class names ending with ‘ExtendedService’ have higher priority for registration on the DI container. This is useful to make sure that the class will be registered and will replace any existing DI registrations. For example: if JobExtendedService class is present and implements IJobService, then replace existing registrations.
Running local Blueprint version for development
- Link your blueprint globally
cd jhipster-dotnetcore
npm link
- Link a development version of JHipster to your blueprint (optional: required only if you want to use a non-released JHipster version, like the master branch or your own custom fork)
You could also use Yarn for this if you prefer
cd generator-jhipster
npm link
- Create a new folder for the app to be generated and link JHipster and your blueprint there
mkdir my-app && cd my-app
npm link generator-jhipster-dotnetcore
npm link generator-jhipster (Optional: Needed only if you are using a non-released JHipster version)
jhipster -d --blueprint dotnetcore
Microservices
You can also take a look at https://www.jhipster.tech/microservices-architecture/
Microservices Artictecture
 microservices
Monolith
 monolith-jwt
 monolith-jwt
Monolith structure
AppFolder
├───docker -> all docker related files
├───src
│ ├───MyApp
│ │ └───ClientApp -> all client related files
│ │ ├───src
│ │ ├───test
│ │ └───webpack
│ ├───MyApp.Crosscuting
│ ├───MyApp.Domain
│ ├───MyApp.Domain.Services
│ ├───MyApp.Dto
│ └───MyApp.Infrastructure
└───tests -> Server tests